Thursday, 21 February 2013
Designing the dream (part2)
Continued...
Using brush tool no 33 for
small stars to create distance, firstly in white and then in other shades to
gradually build up a star map effect. Changing the colour of the stars wasn’t
very noticeable on the black background so I made more clusters of stars to
make them stand out more.
Designing the dream (part1)
Earth
Because I had no idea what to choose for my Psd topic, I decided to write a list of the things that interest me where films are concerned. My interests include science fiction, aliens, space and crime. This led me to get pictures of planets and space. I then had the idea that I could alter the planet to look alien by changing the colour of it. The original image is a very beautiful picture of the earth surrounded by darkness.
I wanted to make the planet
so it didn’t fill the screen so that I could add characters or actors or create
some kind of alien beings. I was also thinking about having some ships or
spacecraft, maybe some kind of fight or some laser beams.
The characters are some of
my favourite actors and actresses. I
just made a list of my favourites and tried out a few images.
I didn’t want the planet to
take over the whole case so played around moving, rotating and resizing it
using the move tools. I opened the amaray case with the guides to make sure it
would fit the guides so I’d have an idea of the overall finished look.
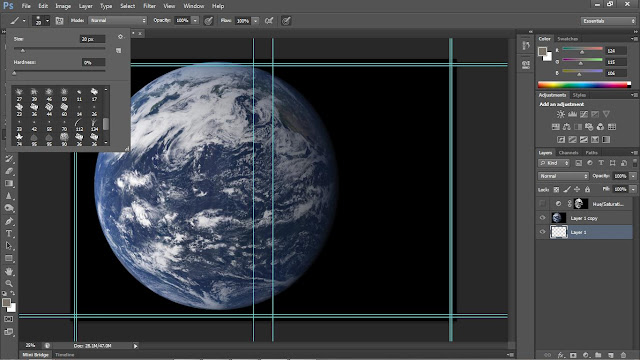
In this image you can still see the guides, I tried to carry
on by removing the guide lines from view temporarily using the show guides
button on the view tab as although helpful, I found them little difficult to
work with.
I tried to change the colour of the planet using the hue and
saturation tabs. I created a mask to highlight the range of planet colours then
chose a light blue to make it look alien but not outrageous, I still wanted it
to have a realistic feel.
I used the mask creation tool so I could isolate the planets colour range then selected the paint dropper to choose the colour I wanted
to sample.
The final effect is a mysterious blue coloured planet. This
is the basis for my theme to which I will add layers.
Using the brush tool to
create stars in the sky
Using brush tool no 33 for
small stars to create distance, firstly in white and then in other shades to
gradually build up a star map effect. Changing the colour of the stars wasn’t
very noticeable on the black background so I made more clusters of stars to
make them stand out more.
Layer tools to create
Wednesday, 13 February 2013
Smoothy
First use of the healing brush tool in photoshop, I used a rather wrinkly picture of Ian McKellen and made him into a smooth criminal! Here are the before and after pictures.
You will notice that there are pronounced wrinkles on Ian's forehead, under his eyes and around his mouth.
I have used the healing tool by sampling areas around the wrinkle and smoothed them out. Each wrinkle sampled a different area parallel to the wrinkle and was then used to make the wrinkly disappear. Here is the resulting, more youthful looking Ian.
His forehead is a lot smoother, and so is the area under his eyes. I used the lighten setting on the shadowy side of his face as the wrinkles became a lot darker and more pronounced using the 'normal' setting. Using the 'Lighten' setting helped me to blend the more pronounced shadowy lines.
Trish P
Welcome to my world.
This is my first attempt at Photoshop artwork.
See if you can find the hidden Skelebird!
Subscribe to:
Comments (Atom)


