Monday, 18 March 2013

Corona around the planet

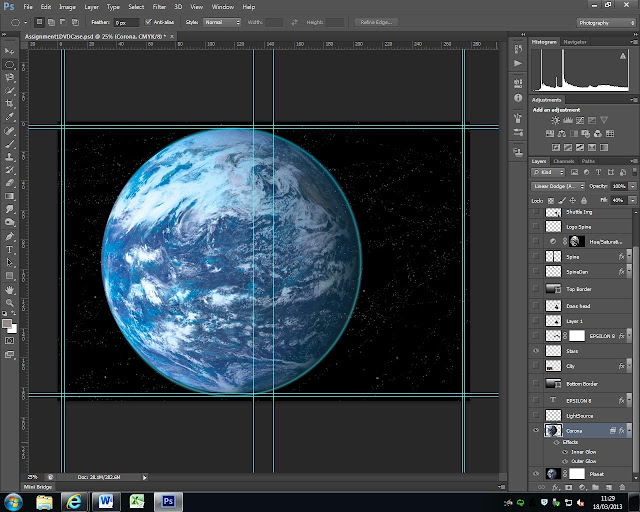
I created a layer called Corona to give the planet a bit of oomf!
I drew a circle using the elliptical marquee tool and then made the circle thicker and used the linear dodge blend tool.
 
I used an inner and outer glow and then changed the advanced blending omitting the Cyan colour range.

This is the planet with the layer and corona.

I then created a light source so the planet would have another focal point. I used a large brush and colour light blue to paint an area on the edge of the planet by using a layer called light source.


At this point, the stars looked small and insignificant so I created another layer called stars and used a small brush size spatter mode to create more stars.


This give the overall feel of a real planet now.


Having a go painting Daniel Craig with a brush to get some costume effects. I don't think this is working too well so far :(
Before:
 
 
The image is awful, so I have tried to colour it in!
 
After:
Looking strange! I've managed to get an astronaut and I'll be lopping off his head using laso tools and then replacing it with Daniel's . I'll also use filters
Here's the link for the astronaut:


Adobe Illustrator DVD Label For Epsilon Project

Started off with DVD label template and copied my pic of Dan Craig into it


Copied it onto my DVD label template


Locked the layer and added a layer called face and used the pen tool to trace the face shape using black stroke and no fill
Drew around the face, ears and neck

Added another layer called hair and used the pen tool followed by convert tool to add shape to the hair trace
Added another layer to the trace image called features so that I could trace the eye shape using an ellipse tool and using a black fill, using the same method, I did the eyebrows, nose, lips and chin, but with the chin I used a black line. I also traced around the dark black shapes in the ears and around the eyes.


This is how all the dark shadows look. By toggling on and off the different layers I could see the picture start to take shape.

I adjusted the neck because it looked like there was a bit missing!
 
I have now selected all the layers, selected the hair outline and filled it with black


Now with the face selected, I am going to fill it with a colour from the spectrum.

I want the outline on the face to be stronger so I am going to increase the stroke width to 3 for now


Now it’s starting to look like a comic book style which is what I wanted.
I used the eyedropper tool to get the same colour for the neck and ears


The neck looks strange now, so I will adjust it by using the anchor point remove tool.

I increased the width of the bottom lip using the stroke button and increasing the weight and also the cap to rounded


I wasn’t happy with the top lip so I re-drew it
 
I am now going to give Daniel some light in his eye using a white fill and the ellipse tool

I then went back and did some more work on the features around the eyes and nose


I have created another layer called backdrop and I want to give it a space feel so I am using the blue gradient fill colour.


I wasn’t happy with the shadow on the face so I redrew it
 
Still not happy with the neck, I deleted it. I have also moved the eyes so Daniel is looking at us.

 I need to add the astronaut costume.


Wednesday, 6 March 2013

Epsilon Opacity Levels

In my original image the city is placed in a frame with a gradient layer fill, I wanted the planet to be visible through the skyline so have used opacity at level 69% with the border level selected.
Before the city has a weird skyline:

and after the city sky has become more opaque and you can see the planet through the skyline:
#
 
Now if I decide to change the colour of the planet, the city will take on the same colour in the skyline.

Epsilon Adjusting Levels

I am using the Adjustment level tools to alter the appearance of the shuttle in space to look less bright

I used image > adjustment > levels > increased the contrast and light and customised the magenta to 4, 0.82, 242. I decreased the cyan levels and increased the yellow output levels to 255.
 
 
 So this is before:
and this is after:

Notice the colours are more vivid, and here it is in the final placement


I may still move the shuttle depending on where the actors are going.


Epsilon Taking shape


Adding the text with texture and colours

I created the name of the film Epsilon 8, the text has been metalicised and flipped sideways

Then for the main title on the dvd I used an arch effect and altered the position to go around the planet


Then moved and altered the lettering

I added a darker colour and an inner shadow to the lettering and also made it darker.
Found this as backdrop layer for city on planet
The image overtook the work as a layer so I had to make it more opaque
Changing the lettering on the spine cover to match the patterned texture on the front cover
I decided to put daniel craig above the dvd in the spine
 
I did this by copying his head onto a separate layer
As I was working on the spine I decided to add the PG logo onto a separate layer
http://www.brandsoftheworld.com/sites/default/files/styles/logo-thumbnail/public/0018/0848/brand.gif
This had a white background which looked weird so I cut it out using the magnetic tool and copied it to a new layer then deleted the original.
I then created a darker spine so the logo and pic of Daniel craig would stand out more, I created a spine layer and used a gradient tool to colour it from grey to white and then used transparency so it would not hide the dvd title.
I wasn’t happy witth Dan or the title so I applied different blending options to make it stand out more and give it a metalic feel.
Now I will change the title on the planet to match for continuity, it stands out better
I changed the arc of the text stretching it in different places to make it look like it was moving, I selected the text and clicked in the middle which openend the arc
Then  I was able to move the text around to the positions I wanted using the grab handles and other coordinates to give the text different shapes.


I decided to use a city scape to put on the back of the case to show the planet was inhabited. I cut out using the square cut tool and pasted it onto another layer. I want this to overlay the planet on the back with a border


I also want Dan craig and the other characters to appear on the back in a ‘scene’ from the film
I may have to move the city scape and mask out the sky area to appear alien like.
I am trying to create some bordered frames using the rounded rectangle tool on a new layer called top border and one underneath called bottom border
I have changed the edges using the sytle options tool and left the fill area as gradient and edge as a heavy black line. named the layer top border.Control J to duplicate and call it bottom layer.
I then took the city image, resized it and snapped it to the bottom layer
Found this pic online, going to place the image in the space background after cutting it out on a separate layer
Using magnetic laso tool.
Now I can resize and place the image